


So, you’re visiting a new website, and after soaking in your first impressions, you start scrolling to see what else the site has to offer. But something’s different – some elements of the page are with you no matter where you go. Maybe the menu is constantly on the side of the screen to help you navigate away from the page in a blink of an eye, maybe the header is always there with you, or maybe there’s a video that just keeps playing while you’re exploring. Each of these cases means that you have encountered a sticky element.
In short, a sticky element is an element of a website (page) that looks perfectly normal once you get to the page because its position is relative, but then its position becomes fixed, and it comes with you wherever you scroll. They stick around and are therefore known as – sticky.
But why should you use sticky elements? Well, there are several important benefits to that. First of all, people seem to genuinely like them, and this was shown by several studies in which an overwhelming majority of participants said they prefer sticky headers. And we all know how important it is to cater to our visitors’ wishes. A happy visitor will stay on your website longer.
One of the reasons people like sticky elements so much is that they help them navigate a website efficiently. Imagine that there is a particularly long blog post on your site. Once the reader finishes it, they will want to move on and maybe read something else, but if they have a sticky menu right there showing them where they can go next, they are much more likely to actually do so. A lot of scrolling can be tedious and result in a person leaving the website altogether. In other words, the bounce rate will be lower, plus people will get around your site faster.
Additionally, employing sticky elements can open up some exciting design options for you. Simply, you have more choices and things to play with, which will allow you to fine-tune the user experience you provide.
But how can you make this happen? How can you add sticky elements to your website? Well, it’s actually quite simple, and the good news is that you don’t need any coding knowledge at all. All you have to do is download and activate a plugin for your WordPress website, and you will be able to customize so many things concerning your sticky elements to give your website’s appearance some extra flair. All you need is a mouse. And which plugin would that be, we hear you ask. Well, allow us to introduce you to…
WP Sticky
Yes, WP Sticky is the answer to all your questions related to creating sticky elements. It is extremely simple to use, allowing you to create a sticky header, sticky menu, navigation, widget, or basically any other element in literally less than a minute. Not to mention that you have a staggering amount of options that can help you customize each and every sticky element you create.
How does it work?

As we said, it’s all very simple. Upon installing and activating the plugin, just click Add New Sticky Element, set its nickname, and click the Pick Element button. Once you click, you will be taken to your website, but it will become highlighted as you hover over each element. All you have to do is click on the element you want to make sticky, and voila – you have a sticky element on your website (obviously, don’t forget to click Save Changes after you click).
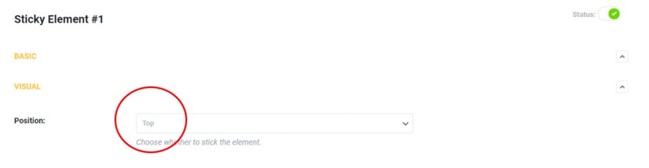
But there are so many other options than that, options that are meant to help you blend that sticky element into the website seamlessly or help it stand out if need be. You can, for example, decide whether the element you choose to make sticky will be displayed at the top or the bottom of the screen; you can define how far it will be from the edge of the page and stuff like that.
It is even possible to add a couple of cool effects to the element so that they fade in or slide down as the user starts to scroll. You can also make that element as transparent as possible or add a different background color to emphasize it on the screen. All of this, too, is done by using nothing more than your mouse, so you won’t ever need to worry about the coding of any kind.
You are also not limited by the number of sticky elements you can create this way. Simply name them differently, and you will be able to manage them as you see fit. A sticky header, menu, or even a widget can all be created this way, and you can turn them off for particular pages if you don’t want anything to stick there.
And the impressive thing is that we haven’t even covered all the visual options you get to customize, not to mention the advanced options (yes, they have those, too!). The bottom line is that you will be able to make your site look exactly as you want when you insert the sticky element in it without the slightest problem. All in just a minute or two!
What else do you get?
But that’s not all you can hope to get from this product. It certainly needs to be mentioned that the plugin works flawlessly with literally any WordPress theme, and it works well with other plugins and page builders, too. So, if you want to create an Elementor sticky menu, for example, you can do so easily. Therefore, you can utilize WP Sticky pretty much however you want.
It also needs to be said that you get top-tier support here as well, right from the people who actually worked on creating this plugin. Therefore, you will get the best possible answer every time, but it also pays to check out the plugin’s FAQ section if you don’t understand something. A lot of things are explained pretty well there.
So, only one question now remains: how much does WP Sticky cost? There is some pretty good news here, too, because things are set up very fairly towards the customer. First of all, it needs to be said that none of the main features are hidden behind the paywall – no matter which package you choose, you will get access to everything that makes this tool such a handy thing to have. There are three packages to choose from in total – Single, Team, and Agency – and the only big difference between them is the number of websites they allow you to use this plugin on. You can use it on one, three, or one hundred websites, respectively.

The prices are also pretty fair, and you can actually pay for the basic package in the monthly subscription form, or you can buy a lifetime license for 39$. Given that the monthly subscription is set to 5.99$ buying a lifetime license can pay off very quickly if you’re sure you’ll be using this product for a while (and you probably will). The other two packages at the moment cost 49$ and 99$ respectively, which in both cases also sounds like an excellent deal.
And you have seven days to return the product and receive a full refund, no questions asked. Now that’s fair, right?
Conclusion
Adding sticky elements has become a trend lately, and if you want your website to stay fashionable, you should consider adding them, too. They are a lot more than just good-looking accessories and can provide a more pleasant user experience and boost your site’s performance. People like them, and a sticky menu, for example, can allow visitors to explore your site more quickly and easily.
It is important to note that no coding skills are required to choose the element you want to make sticky and customize it a bit. It can all be done via plugins, and WP Sticky is the best WordPress plugin for that job. You only need your mouse to create and customize a sticky element for your website, and it can all be done in a flash. The plugin works perfectly with pretty much anything you can imagine, so there will be no limits when it comes to its use.
There are no limits to features you can use in each package either, so you just have to decide on how many websites you need to use this product. That’s pretty much the only difference you need to worry about.
So, hurry up and start adding sticky elements to your website today. Your visitors will love it!